

Techniques explained in this article assumes that you already have basics knowledge on how to use Adobe Photoshop.
You will also learn tips for image optimization in search engines.Buckle up Frank, the journey’s about to begin!
What is image optimization?
Image optimization is a process of saving and delivering images in the smallest possible file size without reducing the overall image quality.
How I optimize my images?
Open Photoshop, without creating a new canvas, select your image from your folder and drag & drop it in Photoshop. With CTRL cmd+Alt+I, you open the image editor, and here you will select the WIDTH according to your block width (container size). To make it easier, see the picture below for visual aid:

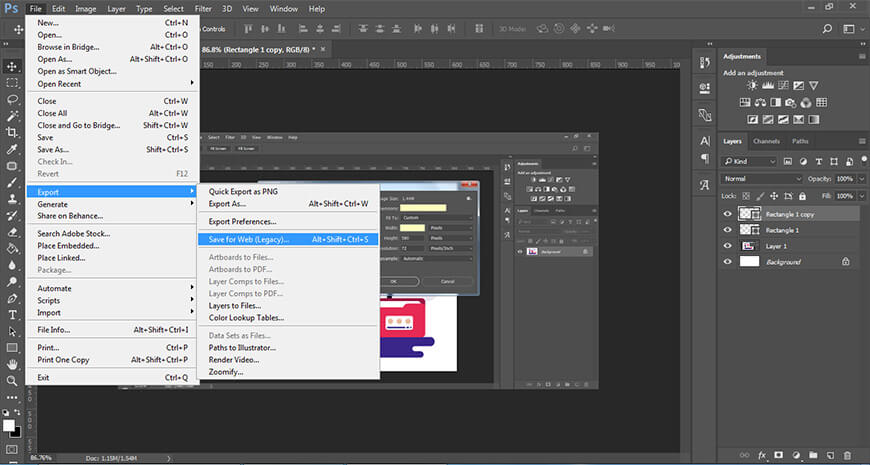
The next thing that we will have to do is to save this image for the web. How do you do that? Simple, instead of “Save” or “Save As”, go to “File-Export-Save for Web (Legacy)”. For an easy visual aid, see the image below:
Here you can play with the Quality option. I prefer it somewhere between 70-80%, as it’s a good balance between quality and size. But you can experiment, and see which setting suits you the best.
Optimize image even more
After I am done with Photoshop optimization, I also use TinyPNG to reduce the image size, even more. TinyPNG is a free browser optimization service for images and can compress 20 files in a session, up to 5MB each. They also have a WordPress plugin, which you can use if you don’t want to optimize them in your browser.
And because the almighty internet is full of so many options, I wanna share another tool to reduce the image size, developed by the guys from Website Planet.
However, if you go with the WordPress plugin option, please note that they have a 500 image optimization limit/month. You can purchase additional credits, and optimize more. But if you are running a smaller website, 500 images per month should be more than enough for you.
Still not sure with this image optimization thing? Stick with us to see some of the reasons you should always optimize your images, and also some SEO techniques for images, that can help you gain even more traffic.
Why you should always optimize your images?
You should always optimize your images for faster website speed. That`s right. The speed of your website and your image sizes are working hand in hand.
Did you knew that if the page takes more than 3 seconds to load, 40% of visitors tend to leave that site? Thus, your bounce rate will increase even more. And also that images make up on average 21% of a total webpage’s weight?
So, you got it, Jack? Remember, optimized images can make “miracles” for you, not only you will save storage space and bandwidth, but also it will help your web traffic grow.
Convert more with images
Images have a way of engaging people, as people can remember more than 2,000 pictures with at least 90% accuracy. This is another way of saying that they will recall your brand if you out-stand with images right on “spot”. People love to see what they buy, so if you use great images, you will also increase your conversions.
Conversion rate means that more of your site traffic converts to meaningful actions that grow your business, whether that means Filling out a form to become a member or Making a purchase.
That has been said, all is left to talk about image SEO optimization in WordPress. Ok? Let`s give it a try. Are you still with me?
Image SEO optimization in WordPress
What’s going on? Well, this part is dedicated to optimizing your image for search engines.
But first, let’s learn how to add a featured image in WordPress.
1, 2, 3 …. Go!
Just for a bit, we need to go back in time, to the article that taught us “How to create a new post in WordPress?“. If you did not read the article, you might take a peek.
So, a featured image, right? Good. After you hit “Add new”, on the right menu, scroll down until you see “Featured image”, click on that. It will pop-up a Media Library, from where you will select your image.
Important: Before you hit select image (assuming that you already optimized it), DON`T FORGET to add ALT Text (Sorry guys if it seems that I am yelling :D).
What the heck is an ALT Text?
Alt Text (alternative text), also known as “alt attribute”, “alt description”, or “alt tag,” is used within an HTML code and acts as a title for the image, if for some reason the image fails to load.
Another important thing image ALT Text can help you achieve is to turn your images into hyperlinked results in search engines – giving your website more exposure, hence more organic traffic.
Quick Tip – When naming your images (ALT Text), try to be as accurate and descriptive as possible. If you plan to add underscore “_”, don’t. Instead, use hyphen “-” to separate words. Search engines will see your image title as a phrase, and not as a single word.
How images can boost my traffic?
For example, if you name an image “Salmon with Grilled Eggplant and Chickpea Croutons” when people search for a recipe with salmon and choose the image search, your image might pop up there between the results.
When someone clicks on it, bam…they will be redirected to your website, hence more traffic.
Let’s cut to the chase
Consequently, always optimize your images, and don’t forget to add ALT text, to gain more traffic from image search.
And, if we are still in terms of images, I recommend this article-“24 Websites Where You Can Download Free Stock Photos in 2019“.


No Comments